Your Guide to Amazing Homemade Cinnamon Rolls
Cinnamon rolls are an iconic bakery treat, but they’re not as difficult to make at home as you might think! They do require some time and patience, but after going through the steps to make these Pumpkin Cinnamon Rolls with Maple Glaze, you’ll have the confidence to try making them on your own.

Working with Yeasted Dough
Cinnamon bun dough is a sweet enriched dough, similar to a brioche. The difference between a lean bread dough and an enriched dough used to make sweet bread and rolls is that enriched doughs contain ingredients like milk, eggs, and higher amounts of sugar. Lean doughs, like those used to make baguettes, contain only flour, water, yeast, and salt. Although there are subtle variations in different cinnamon bun recipes (for example, we added a bit of pumpkin puree to our dough) these tips and techniques still apply.
When working with yeast, the ideal temperature to activate the yeast is around 100 to 115 degrees F. It doesn’t need to be exact, but the yeast needs to be added to ingredients that are warm enough to activate it yet not too hot to kill it. In this recipe, we add the yeast to the warm milk to activate it before mixing in with the other ingredients. Make sure the milk isn’t too hot—keep it under 130 degrees F. Use a thermometer if you want to be extra cautious. If the yeast dies, the dough won’t rise properly.
Our recipe calls for instant yeast, but you can also substitute active dry yeast. If you’re using active dry yeast, make sure to let it dissolve in the milk mixture for at least 5 minutes before adding to the mixer to rehydrate it, and use about 25% more yeast. So, for our recipe, use 2 ¼ teaspoons instant yeast or about 2 ¾ teaspoons active dry yeast.
The process of making bread typically requires two separate rises. The first rise takes place immediately after making the dough, and the second comes after shaping the dough. This is true for making cinnamon buns as well. The time it takes for bread dough to rise properly varies significantly based on factors like the temperature in your kitchen. For example, it will take a lot longer for the dough to double in size if your kitchen is cold.
If your kitchen is on the colder side, try finding a warmer spot in your kitchen to let the dough rise. For example, it helps to place the dough in a turned-off oven with just the light on, or near the stove that was previously turned on. You don’t want it to be so hot that it cooks at all—a temperature just above room temp, around 80-90 degrees is ideal.
Rolling & Filling
The basic filling for cinnamon rolls is a combination of cinnamon, sugar, and butter. For our Pumpkin Cinnamon Rolls recipe, we’ve added pumpkin pie spices like nutmeg, cloves, allspice, and ginger to the mix as well.


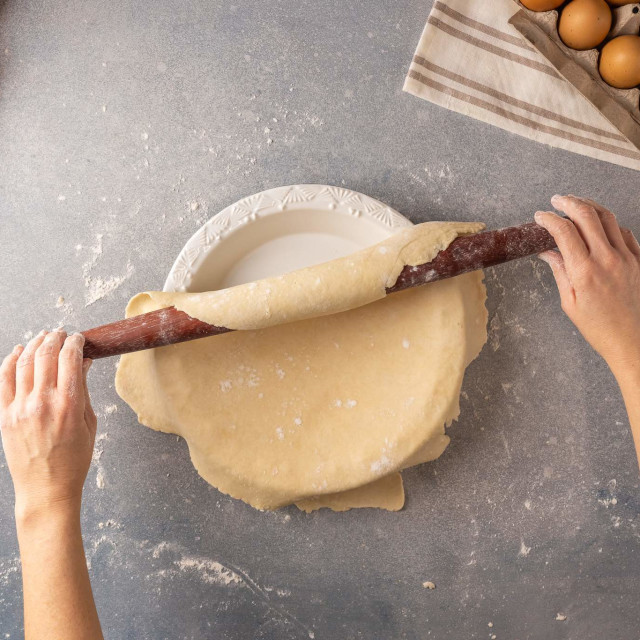
To form the cinnamon rolls after the dough’s first rise, you simply roll out the dough into a large rectangle, then spread a layer of filling—softened butter and the cinnamon spice mixture—on top of the dough. Then, you roll it up like a log and cut into slices about 1 ½ inches thick. When you roll out the dough, make sure to be generous with the bench flour. This dough is very sticky, and you don’t want it to stick to the surface or rolling will be difficult.

To cut the dough into slices, you’ll need to use a very sharp knife and position the roll with the seam facing down, so it doesn’t come unraveled. If the knife is too dull, it will crush the rolls and leave them a little bit smooshed and oval in shape. If this happens though, you can always gently reshape with your hands after slicing and they should still turn out just fine.

Another way to cut dough log into neat slices is to use a thin wire or even dental floss. If you try cutting the rolls with dental floss though, make sure it is unflavored to avoid any minty flavor in your cinnamon rolls! It would also be helpful to use a narrow slicing knife in this instance. Since a knife has more surface area than wire or floss, the sticky dough sometimes adheres to it. However, you can help alleviate this issue by flouring the knife or wiping it down in between slices.

Baking & Frosting
After you slice the cinnamon rolls, place them fairly close together on the greased pan. When they double in size after the second proofing, they should be touching. This will help to maintain their round shape and not spread out too much. It will also keep the sides of the rolls light and fluffy and avoid over-crisping.

There are many different types of pans that work well for baking cinnamon rolls. For instance, you can use a round cake pan, forming the rolls in a circle. You can also use a jelly roll pan, or a rimmed sheet pan. If you use a darker colored pan, the rolls may get a little browner around the outside or on the bottom where the rolls touch the pan directly. If you use a larger pan rather than nestle all the rolls in snuggly, they may spread out a tiny bit more. This isn’t necessarily an issue—just something to keep in mind.
When you bake the rolls, keep a close eye on them to monitor color. They take about 20 minutes to cook through, but you can cover them with aluminum foil partway through if you find they are browning too quickly on top.
Now is time for the best part—the frosting! Traditional cinnamon roll frosting is made from powdered sugar with either milk or cream added, and usually a bit of vanilla extract. To top our Pumpkin Cinnamon rolls, we add a little bit of maple syrup as well, and used maple extract in place of the usual vanilla extract. It’s delicious and perfectly complements the pumpkin flavor in the rolls!

We know it’s hard to resist digging in immediately but try to let the rolls cool slightly before frosting them. If they are piping hot, the frosting will melt and become runny.

And that’s it! We hope this article gives you the confidence to try making cinnamon rolls on your own. Trust us, the taste is so worth it!
Get the Perfect Fall Recipe Fresh from the BigOven Kitchen
Pumpkin Cinnamon Rolls with Maple Glaze